 This sculpture, Whisp, is decorated with forsythia fibers. The process took two days — and yields only 5 thin sheets of paper! I do like the whispy texture it gives, so I'll give this plant another try ... one day.
Below are the steps I took from harvesting the fibers, to making the paper.
Materials:
- Stainless steel stock pot
- Soda ash
- Stir stick
- Digital Scale
- Papermaking mold and deckle
- Large basin
- Cloths
 Step 1
 I went outside with garden snipers and began clipping off thick branches from my forsythia bush. Don't clip thin branches — they have less fibers. Look for branches that are about 1 inch thick.
I collected as enough branches to fit into my steamer.
 Step 2
Cut at 45 degree angle (to help peeling easier in next step), and place into a steamer.
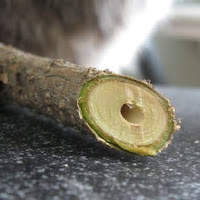
 Here's a cross section of a branch — outer bark, fiber (light green), and the woody core. All we want is the fiber, and steaming will make it easier to strip off.
  Step 3
Cover and steam for 30 minutes. Open windows for ventilation.

Step 4
After steaming, peel away the outer bark, and strip the fibers away from the woody core.
 Left to right: bark, fiber, and woody core.
This basket of dry fibers weights about 4 oz, yields about 5 thin sheets.
If you wish to continue with papermaking, continue to step 4. Otherwise, dry the fibers and store in a dry/moisture free place. Dry fibers can be stored indefinitely. When you're ready to make paper, rehydrate the fibers by soaking it overnight
 Step 5
Fill 2/3 of the pot with cold water — you don't want hot water to overflow when you add the stems. Measure out soda ash and add to the pot of water. For every 1 liter of water, use 15 grams (1/2 ounce) of soda ash.
When water is beginning to simmer, add fibers. Let it simmer for 2 hours.
Open windows and doors for ventilation. Every 1/2 hour or so, give it a stir.
 Step 6:
After 2 hours, the water will be dark and thick. Drain and rinse the fibers until the water runs clear.

Step 7:
Begin to pound the fibers until it turns into pulp.
 Step 8:
Set up your couching area by layering a pile of cloths.

Step 9:
Fill basin with water and add pulp. Agitate the water to distribute the pulp evenly.
Slide your mold and deckle into the basin, lift up, and let excess water drain.
 Step 10:
Remove the deckle and bring the mold over to the couching area. Flip the mold over, paper side down, and sponge off excess water.

Step 11:
Gently lift off mold, and allow the paper to dry flat.
No comments:
Post a Comment